|
Intro
Why have a central vac system? (What's wrong with my upright/cylinder cleaner?)
Well, to be honest, I saw them when I was in America once and always thought it was a good idea, plus I love gadgets!
There are lots of benefits too! Not least the fact that old air and dust aren't recirculated around the house.
(these units vent externally, or into a non living area)
Additionally they are almost silent in operation, the unit needs very infrequent maintenance, the dust collector
is so large that it only needs emptying every few months and you don't have to carry a large heavy vacuum around
the house with you. Cleaning the stairs is especially easy (and especially difficult with a normal vacuum cleaner)
If you like the look of these pictures:


then read on...
....A little bit about this site
Clicking on any of the small images will open a larger version in a new browser window.
(try on some of the examples above)
I hope you like the site and enjoy reading about my little project.
The site is deliberately quite simple in its design, I think this makes it clean and easy to read. I try where possible
to avoid using any nasties like popups etc..
I didn't use anything other than good old notepad to design this site,
dreamweaver is great - but you don't need it... That said, you don't really need a central vac ;-)
Design
I spent absolutely ages planning this, I had originally intended to fit a central vacuum system when we first
bought the house, but never did. Recently I've boarded out and reinsulated the loft, and it seemed like
an ideal location for a central vacuum system, so the idea was reborn.
The main things to consider are the pipe run itself (and trying to hide as much of it as possible) the location
of the outlets to provide best coverage of the house and the vacuum unit itself.
All of the information I used to make my decisions was found on the various websites that I have listed in my
Useful Links section.
Installation
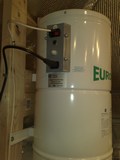
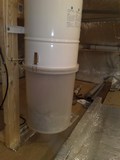
Ok, I started with the installation of the vacuum unit itself, I decided to fit this in my loft, as I have
a lot of space in there and it is now nicely boarded and easily accesible.
I already have some stuff in the corner of the loft, such as a fileserver and bathroom extractor fan so this
seemed like an ideal location, it is also near the external wall I'd planned to run the pipework down and close
to a source of power (these units need a standard 13amp socket or fused spur)
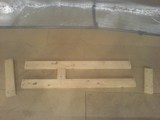
The first job was to build a small mounting frame for the vacuum unit that would support its weight. For this
I biscuit jointed up some planed softwood to make a pretty simple mounting frame that was then screwed to both
the loft floor and the roof timbers.
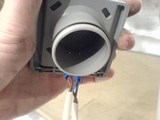
Once the unit is mounted I connected it up to the mains (easy really, just plug in an IEC power lead) and also
connected the 12volt low voltage switching connections too. The 12v side connects to all vacuum sockets and
triggers the vacuum unit when the two contacts are closed.
I then mounted the first socket, this is a utility socket in the loft, I decided to have one in the loft
as I quite like the look of those vacuum storage bags for duvets and blankets, so having a vacuum point in
the loft will be useful, also for dusting things off before bringing them from the loft back into the house.
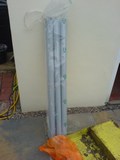
All pipework is simply joined together using solvent weld glue in much the same way that some plastic plumbing
fittings are connected, in fact the tubing used is remarkably similar, except that this tubing is 50mm Outside
Diameter, which is a slighly unusual size.
The low voltage electrical connections are made using simple 2core flex, I chose to crimp connectors on to it,
but the norm seems to be just to wrap the wire around the terminal screws. I think crimping is neater.
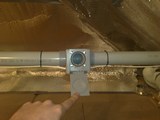
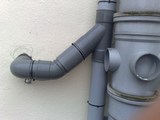
You might notice that all bends are swept and made using 45degree bends rather than tight 90degree elbows,
there is good reason for this, tight 90degree bends are only used immediately behind each socket, this means
that any obstruction or blockage should only occur at the socket (where it can be easily cleared) but once inside
the main pipework, the diameter of the pipework is slighly larger than the hose or the socket inlets and the bends
are more gradual so in theory a blockage should never occur in the difficult to get to pipework.
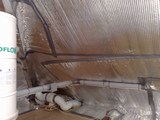
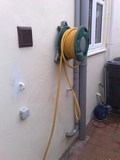
My pipework runs around the loft a bit, and then through the foil insulation, down the roof timbers and through
the soffet. From here it runs down an exterior wall alongside the soil pipe and makes two entries into the
building. One is into the upstairs landing, the other goes under the kitchen units.

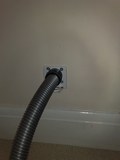
The upstairs landing fitting is fairly straight forward, this just goes into a socket on the other side of the
wall (notice the 90degree tight elbow on the outside)
As well as the pipework, the low voltage cable has to be ran to all sockets as well (as it is this that triggers
the vacuum unit) the approach I took was simply to cable tie it as neatly as possible to the pipework

As for the kitchen, this pipework runs under the kitchen cabinets, where it branches off to a vacpan under one
of the kitchen units and also to another socket on the ajoining wall in the downstairs hallway.
Fitting the vacpan is fairly straight forward, as is fitting the sockets, but as I was fitting into a partition
wall (well actually a blocked off doorway) the job was even easier. I did opt to use washers as well as screws
to mount the sockets to the wall as when pulled sideways it is possible to put quite a lot of force through these
sockets and I don't want mine coming off the wall!! (There is also a nice strong wooden frame behind)
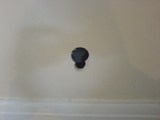
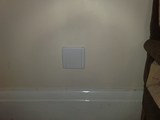
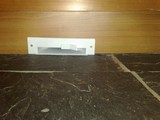
The socket flaps on the front are spring loaded and sealed with an O-ring, once closed they form an
airtight seal so there are no vacuum leaks when the other sockets are in use.
Once closed they are fairly unobtrusive and are about the same size as a single electrical socket
In Use
I cannot begin to tell you how excited I was to switch this baby on for the first time!
My first surprise was how silent the unit it, granted mine is located in the loft (which is well insulated) but
the system really is quiet - which is great if the person not doing the vacuuming is watching the TV!
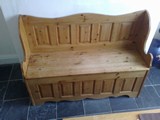
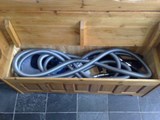
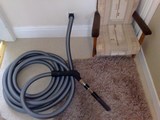
The first issue that needed addressing when the installation was finished was 'where to store the hose and accesories?'
They all fit quite nicely into our settle in the dining room - so that was easy (once the 4 phone books, hats, scarves and fancy dress
outfits that used to be in there had been 'filed' elsewhere)
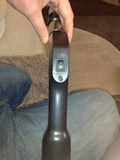
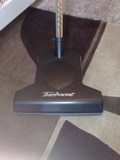
Notice that the vacuum handle has a valve on it to adjust the suction, unlike the ones on many vacuums that are
really just there for show, this one is required!! Using the smaller attachments such as the crevice tool
or upholstry brushes is nearly impossible at full suction, the attachments just stick to whatever you are cleaning
and refuse to budge...
I've opted for 4 outlets throughout the house, one is a vacpan, one is in the loft (and probably won't get much use) and the other two are
on the upstairs and downstairs landings.
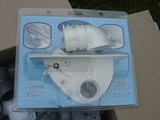
I paid the extra for the 'deluxe' hose kit, this means the hose is a little lighter, more flexible and has an on-off switch on it.
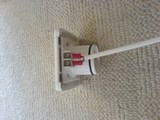
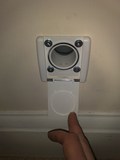
Getting started is a simple affair of opening the socket and inserting the hose so that the two brass pins are connected to the hose connector
(these pins when bridged activate the vacuum unit)
Hoses without a switch just bridge these contacts when plugged in, meaning that the only way to stop the vac is to unplug the hose.
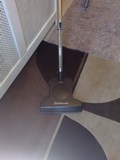
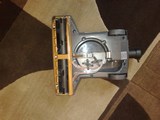
I did go a bit over the top and buy a turbocat brush head, they are expensive but it is a great bit of kit, the brush action is really
quite amazing, and the device actually pulls you forward!!
The vacpan is an interesting idea, and is quite useful, quite simply it is a dustpan that never needs to be emptied!
When the door at the front is kicked open, the vacuum is operated and anything swept into the pan gets sucked up
into the vacuum unit - it really is quite useful for small stuff such as spilt rice, crumbs and breakfast
cereals etc...
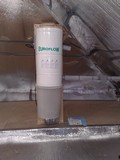
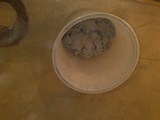
I was amazed how much dirt we picked up in the first week, especially considering that our house has always been vacuumed
almost every day, and that the carpets are reasonably new (and pale in colour, so do show any dirt)
The dust bucket shown below is 25 litres in size!! It's about half full (or is that half empty?) after a week of vacuuming

Conclusion
Well, I hope you've enjoyed what I've done, I love my central vac system.
Good luck if you decide to do something similar, you really don't realise how inferior a normal vac is, until you've tried one of these.
Gone are the days of scrubbing the floor backwards and forwards with the vacuum to pick up a stubborn bit of fluff, one pass with the turbo cat
and it's gone!! (Seriously)
To finish is a sad sad picture..
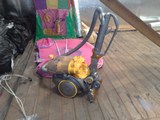
Unwanted and unloved, this old Dyson won't be getting much use anymore!
All the best,
-Dan
Parts List
| Item |
Supplier |
Cost |
Quantity |
Buy |
| Euroflow 1410 Unit |
CVC Direct |
£394.40 |
1 |
buy |
| Deluxe Switched Hose Kit (9m) |
CVC Direct |
£132.10 |
1 |
buy |
| Millenium Socket White |
CVC Direct |
£17.93 |
2 |
buy |
| Millenium Utility T Socket |
CVC Direct |
£18.30 |
1 |
buy |
| 12 Metre Pack 50mm Pipe |
CVC Direct |
£25.75 |
1 |
buy |
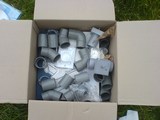
| Starter Fittings Kit |
CVC Direct |
£43.00 |
1 |
buy |
| Additional Socket(s) Fittings Kit |
CVC Direct |
£34.00 |
1 |
buy |
| Vac Pan Kit |
CVC Direct |
£43.00 |
1 |
buy |
| Turbo Cat Brush |
CVC Direct |
£103.90 |
1 |
buy |
|
|
|
|
|
Useful Links
Suppliers:
CVC Direct - I bought all my stuff from them, very helpful and knowledgable.
Beam Vac - Beam Central Vacuums
Central Vac - Beam Central Vacuums
Clyde - You would need a big house for this one!
Vacuduct - Vacuduct Central Vacuums
Smart Vacuums - Smart Vacuums (I was impressed with these people too)
Central Vacuum Systems - Central Vacuum Systems
DuoVac - Duo Vac
Info:
CVC Direct - There is loads of info on here about central vac systems.
Automated Home - A really nice site for all things automated..
Smart Vacuums - They have a nice installation section
Comments
If you enjoyed reading about my project, and would like to leave a comment, please do!
I will post any interesting ones below.
COMMENTS:
---------------------------------------------------------------------------
Roger M, Darlington
Well done! Central Vacs are far more popular abroad,
I don't know why more people don't have them here,
the cost isn't much more, and the time you save is
very welcome. I have one, it's great!
Posted: 11:17 23/03/2008
------------------------------------------------------------------------------------------------
| |
Dan, Bristol
Thanks for your comments Roger, in my mind you were the
best Bond!
I'm surprised you do your own cleaning though ;-)
-Dan
Posted: 09:01 24/03/2008
|
------------------------------------------------------------------------------------------------
Bob B, Bath
Is the Dyson DC11 for sell then....
Posted: 11:49 25/03/2008
---------------------------------------------------------------------------
Tom
Dan. You need to get out more mate!
Anyhow, nice work fella.
Cheers Tom
Posted: 17:09 01/04/2008
---------------------------------------------------------------------------
Paul, Eastbourne
I retro-fitted a DuoVac system about 2 years ago.
Fantastic purchase and makes cleaning the car a breeze.
Love the on-off siwitch at the end of the hose.
I also have a separate hose kit for the car which makes life
so easy with an outlet fitted next to the garage door.
Posted: 09:49 02/04/2008
---------------------------------------------------------------------------
ukdiyforum.co.uk
Excellent read, you've done really well.
Posted: 10:02 02/04/2008
---------------------------------------------------------------------------
David Smith
What a lot of hassle just to vaccum the house.
Wouldn't consider one of these costly systems if they were half the price.
Posted: 21:11 02/04/2008
------------------------------------------------------------------------------------------------
| |
Dan, Bristol
David, David. You are missing the point.
Vacuuming the house isn't a hassle with one of these.
-Dan
Posted: 21:59 02/04/2008
|
------------------------------------------------------------------------------------------------
Peter Cuminmyear, Ashby De La Zouch
This truly sets the standard.
I big pat on the back is deserved, what you've done is tremendous.
Posted: 07:19 03/04/2008
------------------------------------------------------------------------------------------------
| |
Dan, Bristol
Five pounds on it's way to you Mr Comeinmyear!
-Dan
Posted: 09:34 03/04/2008
|
------------------------------------------------------------------------------------------------
Adam
Hey thats brilliant!
What does the wife think of it?
Posted: 11:14 08/04/2008
---------------------------------------------------------------------------
Simon H
Nice pipe work and the central hoover thingy is good.
Posted: 18:11 09/04/2008
---------------------------------------------------------------------------
S. Pharri
I have installed one of these in my home.
Alas I did not know about the Vac Pan Kit, what an
enjoyable idea.
Something I have done though is made a harness for
my English sheepdog which ironically holds the
Turbo Cat Brush. This means that during the early
spring months as Ronseal the dog walks around
the house moulting, the cat picks up the hairs.
If you have a child but no dog I recomend building them
an electric play vehicle and attaching it to the front of this.
Posted: 15:19 10/04/2008
------------------------------------------------------------------------------------------------
| |
Dan, Bristol
Hello Peter!! Always nice to hear from you.
How is the shed roof progressing?
-Dan
Posted: 08:34 11/04/2008
|
------------------------------------------------------------------------------------------------
Stephen Hawking
Another triumph in the world of finding the time
to devise and install things one doesn't really
need but releases time to spend on other projects
that one doesn't really need.
If I had half the self discipline and drive that
you do Dan my house would be too full of
implemented projects to actually live in.
As it stands I have at least 10 A4 (and 2 foolscap)
doodle books of designs which take up a lot less
space.
I think a very useful addition to the costings of
this project would be the number of pints of 'Thorn
that were consumed during the lifespan of the project.
Hope the new job doesn't get in the way too much of
future projects.
Steve
Posted: 12:01 11/04/2008
------------------------------------------------------------------------------------------------
| |
Dan, Bristol
Thank you Steven.
I really enjoyed your book on the Universe.
I noticed though that you forgot to carry the one
on page 18, meaning that the rest of the (otherwise mint)
book is irrelevant.
If my calculations are correct, then it's all to do with lasers.
Cheers (and apologies for rubbishing your life's work)
But (in fairness to me) you should've paid more attention
or used a pocket calculator.
-Dan
Posted: 13:34 11/04/2008
|
------------------------------------------------------------------------------------------------
|
|
|